Rspamd 3.9以降で標準的な外部AI連携機能(GPT Plugin)が利用可能になりました。
1ヶ月程度使用してみたので久しぶりに何か書いてみます。
環境
サーバ: さくらのVPS
OS: Rocky Linux 9.5
Rspamd: 3.13.0
LLM: さくらのAI Engine
メールサーバは個人ドメインのもので月2500通程度メールが届く
さくらのAIエンジンは月3000リクエストまでは無料のプランがある
設定
/etc/rspamd/local.d/gpt.conf
— ここから —
enabled = true;
type = “openai”;
url = “https://api.ai.sakura.ad.jp/v1/chat/completions”;
api_key = “さくらのAI Engine の アカウントトークン”;
model = “gpt-oss-120b” ;
autolearn = true;
timeout = 10s;
allow_ham = true;
reason_header = “X-GPT-Reason”;
— ここまで —
判定例
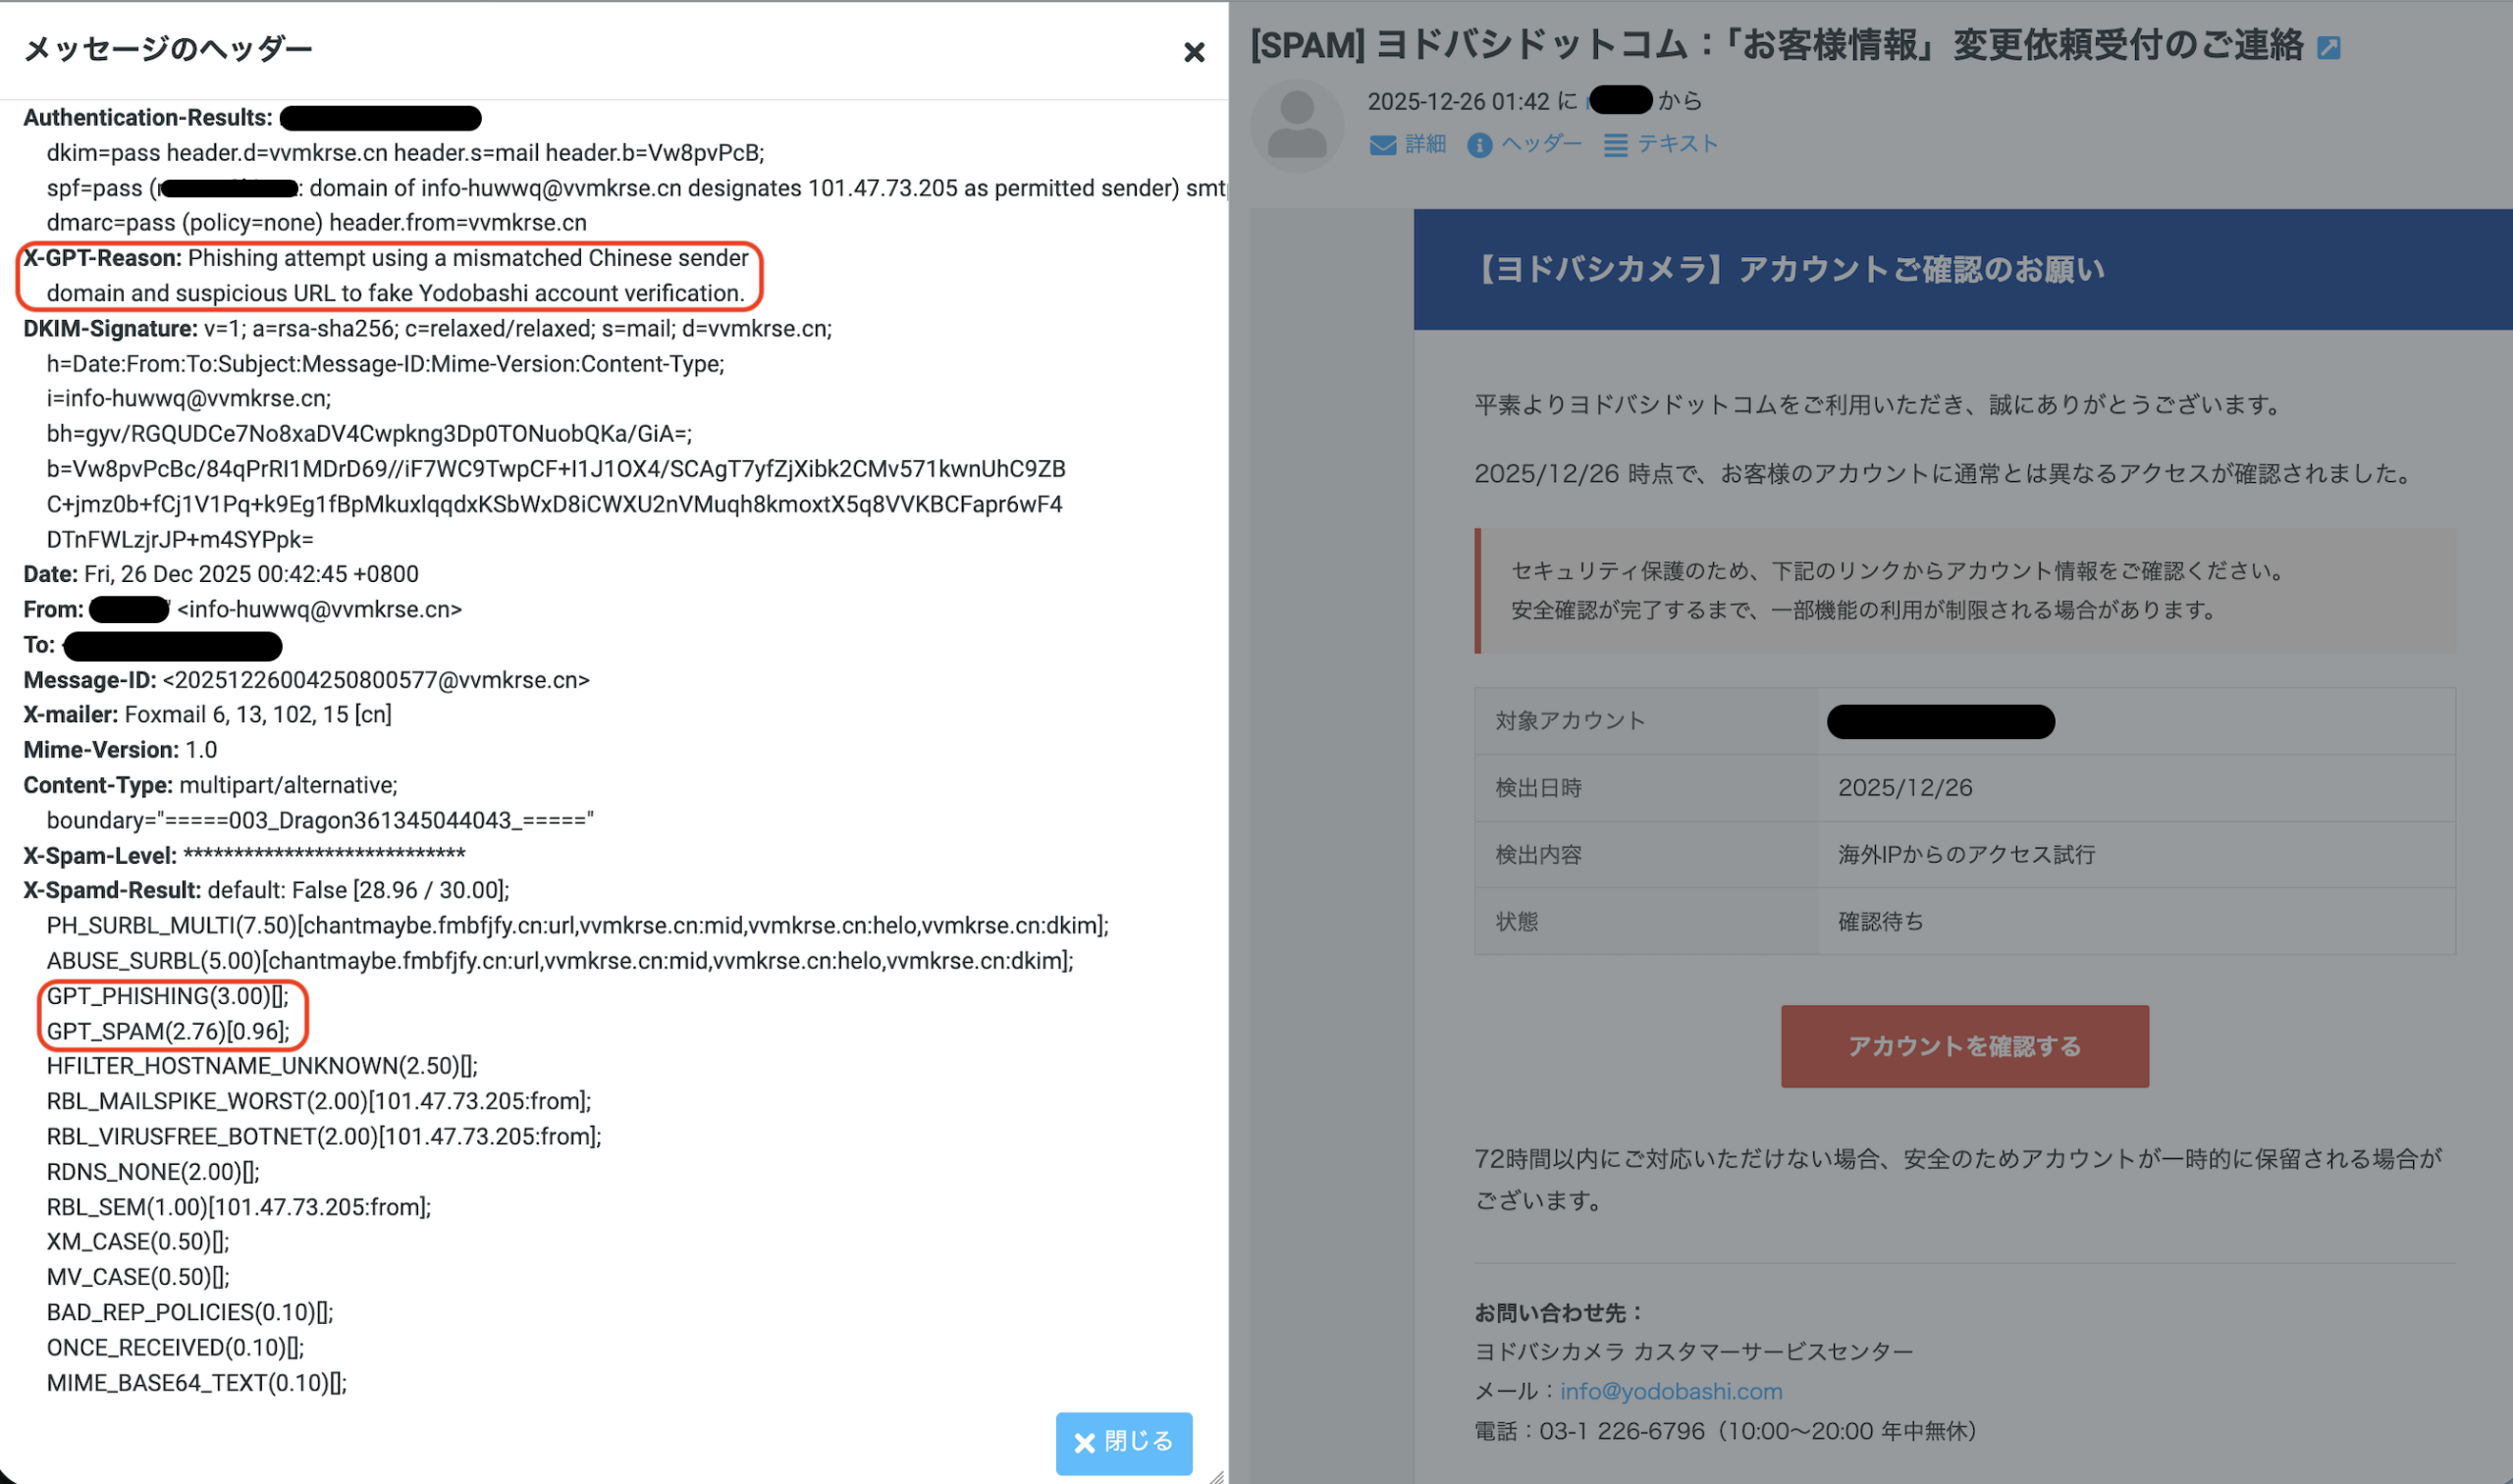
X-GPT-Reason に判定理由
X-Spamd-Result に GPT_PHISHING や GPT_SPAM、GPT_HAMなどが追加される。
結果
集計対象メール数: 2,485 通
GPTの判定平均時間: 1.66 秒 (最長で3秒程度)
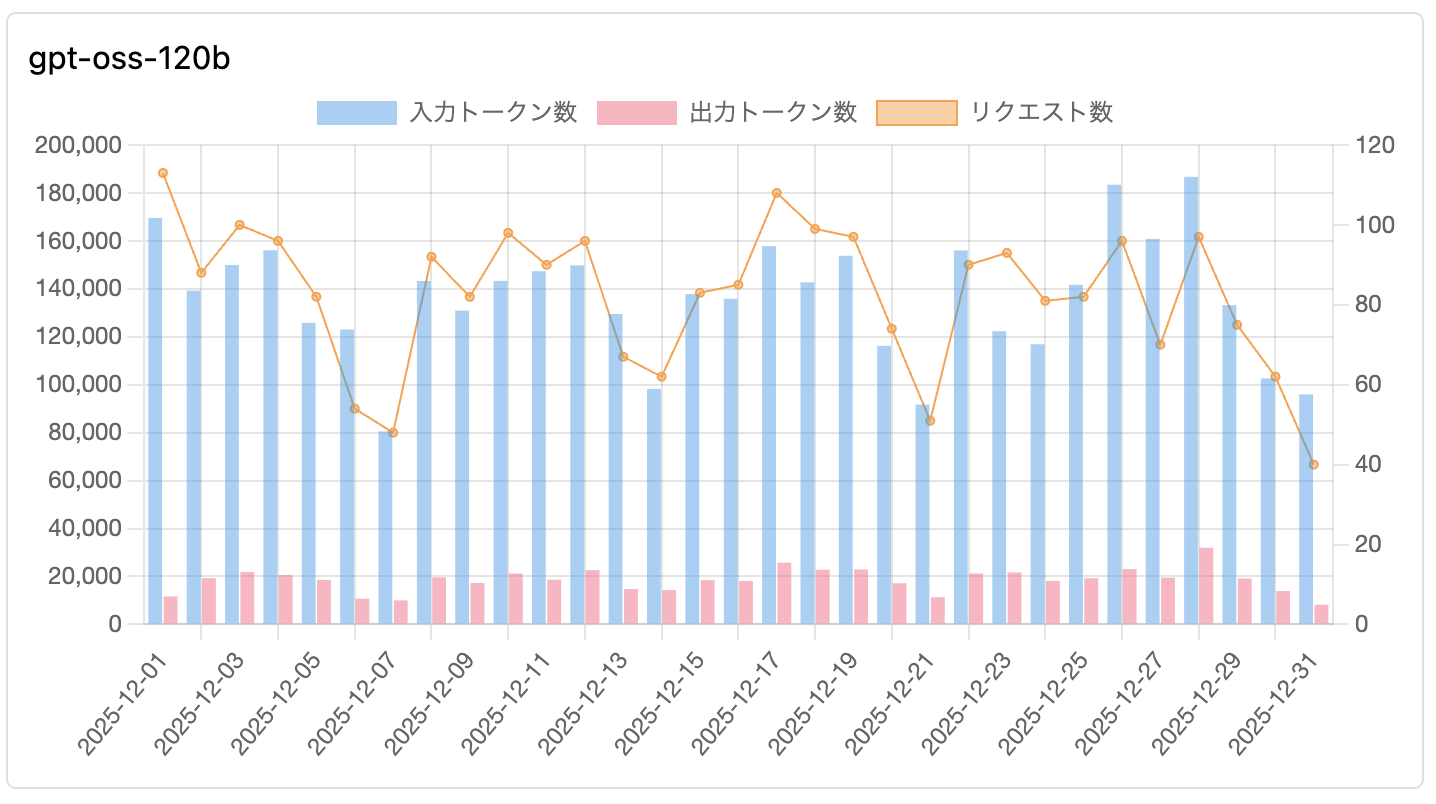
さくらのAI Engine の利用グラフ
1. 【HAM(正常)】判定に多い理由
| 英文の理由 (Actual Reason) | 日本語訳 |
| Legitimate technical mailing list discussion with no suspicious links or requests, indicating ham. | 不審なリンクや要求を含まない、正当な技術系メーリングリストの議論であるため、HAM(正常)と判断。 |
| The email is a legitimate automated TLS report from example.com with no suspicious content. | example.com からの正当な自動生成TLSレポートであり、不審なコンテンツは含まれていない。 |
| Legitimate job recruitment notification from a known domain (example.com) with matching sender info. | 既知のドメイン(example.com)からの正当な求人通知であり、送信者情報も一致している。 |
| Likely ham: a legitimate technical mailing list reply with matching domain and benign URLs. | 正常な可能性が高い:ドメインが一致しており、無害なURLを含む正当な技術メーリングリストへの返信である。 |
2. 【GPT_PHISHING(フィッシング)】判定に多い理由
| 英文の理由 (Actual Reason) | 日本語訳 |
| The email pretends to be from Amazon but originates from an unrelated domain (example.com) and uses suspicious links. | Amazonを装っているが、無関係なドメイン(example.com)から送信されており、不審なリンクを使用している。 |
| Suspicious request for account update or login using an external URL (example.com/path) that is not the official domain. | 公式ドメインではない外部URL(example.com/path)を使用して、アカウント更新やログインを促す不審な要求。 |
| Uses urgency and suspicious links (example.com) to solicit personal information, typical of phishing scams. | フィッシング詐欺に典型的な、緊急性の強調と不審なリンク(example.com)を用いた個人情報の搾取。 |
| Matches credential harvesting patterns by directing to a non-official login page for site administration. | サイト管理用の非公式なログインページへ誘導しており、認証情報搾取(クレデンシャル・ハーベスティング)のパターンに一致する。 |
3. 【GPT_SPAM(スパム)】判定に多い理由
| 英文の理由 (Actual Reason) | 日本語訳 |
| High spam probability due to excessive promotional language, marketing keywords, and unsolicited recruitment. | 過度な宣伝文句、マーケティングキーワード、および未承諾の求人勧誘が含まれるため、スパムの可能性が高い。 |
| Primarily promotional content with multiple marketing links and emphasis on discounts or offers. | 主にプロモーション内容であり、多数のマーケティング用リンクや、割引・特典の強調が見られる。 |
| Frequent use of marketing phrases and a clear intent to drive traffic to a commercial service. | マーケティング用語が頻繁に使用されており、商業サービスへ誘導しようとする明確な意図がある。 |
GPT_PHISHING がついたもので迷惑メールと判定されたくないものが数通あった。
注意
テストしていたrspamdバージョン(3.13.0)と最新のバージョンでプロンプトが大幅に改善されていることに気づいたので、バージョンアップ(3.14.2)をしてしばらくまた様子をみたい。
rspamd 3.13.0
  settings.prompt = "Analyze this email strictly as a spam detector given the email message, subject, " ..
      "FROM and url domains. Evaluate spam probability (0-1). " ..
      "Output ONLY 3 lines:\n" ..
      "1. Numeric score (0.00-1.00)\n" ..
      "2. One-sentence reason citing whether it is spam, the strongest red flag, or why it is ham\n" ..
      "3. Empty line or mention ONLY the primary concern category if found from the list: " ..
        table.concat(lua_util.keys(categories_map), ', ')
rspamd 3.14.2
  settings.prompt = "Analyze this email as a spam detector. Evaluate spam probability (0-1).\n\n" ..
      "LEGITIMATE patterns to recognize:\n" ..
      "- Verification emails with time-limited codes are NORMAL and legitimate\n" ..
      "- Transactional emails (receipts, confirmations, password resets) from services\n" ..
      "- 'Verify email' or 'confirmation code' is NOT automatically phishing\n" ..
      "- Emails from frequent/known senders (see context) are more trustworthy\n\n" ..
      "Flag as SPAM/PHISHING only with MULTIPLE red flags:\n" ..
      "- Urgent threats or fear tactics (account closure, legal action)\n" ..
      "- Domain impersonation or suspicious lookalikes\n" ..
      "- Requests for passwords, SSN, credit card numbers\n" ..
      "- Mismatched URLs pointing to different domains than sender\n" ..
      "- Poor grammar/spelling in supposedly professional emails\n\n" ..
      "IMPORTANT: If sender is 'frequent' or 'known', reduce phishing probability " ..
      "unless there are strong contradictory signals.\n\n" ..
      "Output ONLY 3 lines:\n" ..
      "1. Numeric score (0.00-1.00)\n" ..
      "2. One-sentence reason citing the strongest indicator\n" ..
      "3. Primary category if applicable: " ..
      table.concat(lua_util.keys(categories_map), ', ')